Choose Slide Show from the View Menu to get the following dialogue box:
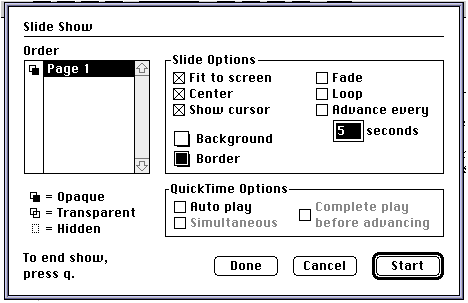
Choose Slide
Show from the View Menu to get the following
dialogue box:
To change the order of the slides, select a page
number and drag it up or down.
Click on the icon left of the page number to select Opaque,
Transparent, or Hidden.
A transparent slide lets you see the preceding slide through it.
An opaque slide covers the preceding slide.
Fit to window - shrinks the picture so the whole
page fits your screen
Center - crops the picture
Show cursor - lets you have the cursor to point to items during the
show
Fade - fades to black
Loop - runs the slide show for you
Advance every - choose the seconds spent on each slide
Next Slide - press the right arrow or spacebar, or
click the mouse button
Previous Slide - press the left arrow
Auto Play - the QuickTime movie starts as soon as
the slide appears
Simultaneous - starts several movies at once
Complete Play - overrides the "Advance every n seconds" (This is so a
slide doesn't advance before a movie begins playing.)
Saves the options without running the
show
Starts the slide show
Hint: You can run the slide show without displaying the dialogue box
by pressing Option when you choose Slide
Show in the View
Menu.
Press "q"or Escape